Ever dabbled in Excel and thought to yourself, “I wish I could just speed up all this repetitive work”? Well, that’s where macros come to the rescue. Macros are like a magic wand in Excel; with just a little flick (or, well, a few clicks), you can automate those mundane tasks that seem to eat up your afternoon.
Recording a macro is a breeze, especially once you get the hang of it. I started using them way back when Excel 2007 came out, and let me tell you, it’s a total game-changer. Whether it’s the latest version or one that’s been sitting on your desktop for a while, these shortcuts are compatible across multiple incarnations of Excel, and yes, even on the Mac. It’s all about making your life easier, one automated step at a time.
KEY POINTS
- I can record macros using the macro recorder in Excel.
- Macros capture my actions to generate backend code.
- Note: I can’t pause during a recording session.
- After recording, it’s crucial to review and refine the generated code, as it’s not always perfect.
- I can add a macro to the Quick Access Toolbar or the View tab for easier access.
- Customization is key; I’ll fine-tune the macro to fit my needs.
What is the macro recorder?
The Excel Macro Recorder is like my handy video camera for Excel tasks. What I do is perform a task once – it could be anything from formatting cells to generating complex reports – and this tool records my actions and spits out VBA code. Next time? I get to chill, because instead of doing it all over again, I just run the macro.
Here’s how I see it:
- Record Once: Perform the task, and the code is automatically generated.
- Play Many: Use that code anytime to repeat the task without manually doing it again.

I’ve noticed a few times when it doesn’t catch everything, but for the most part, it’s my go-to when I don’t want to write code from scratch.
To find this gem, I just hop over to the developer tab.

And if you’re curious about dipping your toes in VBA for Programming in Excel, start with the macro recorder; it’s a foundational skill in the world of Advanced Excel Skills.
Planning before you record a macro
Before I jump into recording a macro, I like to get my ducks in a row. Sort of how you’d plan out a video shoot; get the lighting right, script polished, and all. In Excel, think of it this way:
- Decide What You’re Recording: I pen down every step that I’m about to do. This time around, it’s some snazzy cell formatting. I’m looking to turn the font red, bump it up to size 12, switch it to Verdana, and bold it.
- Active Cell Awareness: It’s crucial to choose my target cell beforehand because if I select it during the recording, that exact cell becomes part of the macro. And I don’t want that. I want the freedom to bold and color any cell I choose later, not just the one I first picked out.
- Stick to the Script: Veering off course is a no-no. Recording a macro is just like executing a recipe; if I throw in extra steps, the outcome gets messy.
Here’s a checklist to keep me on track:
| Plan Component | Details |
|---|---|
| Target Formatting | Red, size 12, Verdana, bold |
| Selection Before Recording | Select the target cell |
| Recording Only Necessary Steps | Avoid unnecessary actions |
As I get ready to record, remembering that each click and keystroke will be part of the macro keeps me sharp. My focus? Record only what I need, nothing more. This way, when I run the macro later, it’ll adapt to any cell I choose – kind of like a tailored suit, fits just right no matter where I try it on.
Steps to record a macro using the macro recorder
I like to keep things simple, so here’s how I record a macro in Excel. First, I pick a cell to start with, let’s say A4. That’s where the magic will happen. Before I do anything else, I make sure I’m on the “Developer Tab”, and I hit the “Record Macro” button. But hey, don’t forget to turn on the relative reference—it’s a game changer.

Now, I click that button, and a dialog box pops up asking for some details:
- Macro name:
HighlightCell - Shortcut Key: I press
Shift + Hto whip up the shortcut Ctrl + Shift + H pronto. - Store Macro in: Gotta make sure it’s in the Personal Macro Workbook.
- Description: This isn’t just any macro; it’s the one that gives cells the red carpet treatment with red color, size 12 Verdana font, and bold text.
Once I’ve filled in the details, I click OK and start formatting:

To let you know it’s actually recording, Excel shows this little icon on the status bar. Every move I make, every format I take, it’s watching.

Then, I get down to business:
- Font Color: Red
- Font Size: 12
- Font Style: Verdena
- Font Text: Bold

After jazzing up that cell, I mosey back to the Developer Tab and click “Stop Recording”. Or, if I’m feeling lazy, I just stop it straight from the status bar.
And just like that, I have a shiny new macro saved in Excel—and you can too!

How Macro Recorder Generates a Code
When I use Excel’s macro recorder to automate tasks, what’s happening behind the scenes is quite fascinating. Here’s a peek into this process:
-
Initiating the Macro Recorder
- First, I start recording by going to the Developer tab and clicking on the Record Macro button.
- This action tells Excel to track my activities and translate them into a corresponding set of
VBAinstructions.
-
Visual Basic for Applications (VBA)
VBAis the language that Excel uses to create these macros. It’s a part of Visual Basic, specialized for the Office suite.- The generated code appears in the Visual Basic Editor, which is an environment designed for editing and debugging VBA code.
-
Structure of Generated Code
- As I perform actions in Excel while recording, each action translates into a
subroutinewithin the VBA editor. - Examples of the code parts generated are:
- Setting font color to red with a
numeric value. - Changing font size to 12.
- Applying “Verdana” to the font style.
- Making the font bold.
- Setting font color to red with a
- As I perform actions in Excel while recording, each action translates into a
-
Subroutines and Variables
- Each task I do becomes a part of a subroutine – think of it as a mini-script within a larger script.
- Variables are used to store data that can change, like cell references or values that I input during the recording.
-
Coding and Control Structures
- The code includes control structures like loops and conditionals, although these are often not as obvious in generated code and may need refining manually.
- The VBA recorder is proficient, but the code often requires tweaking, especially if I’m looking for optimized performance or added complexity.
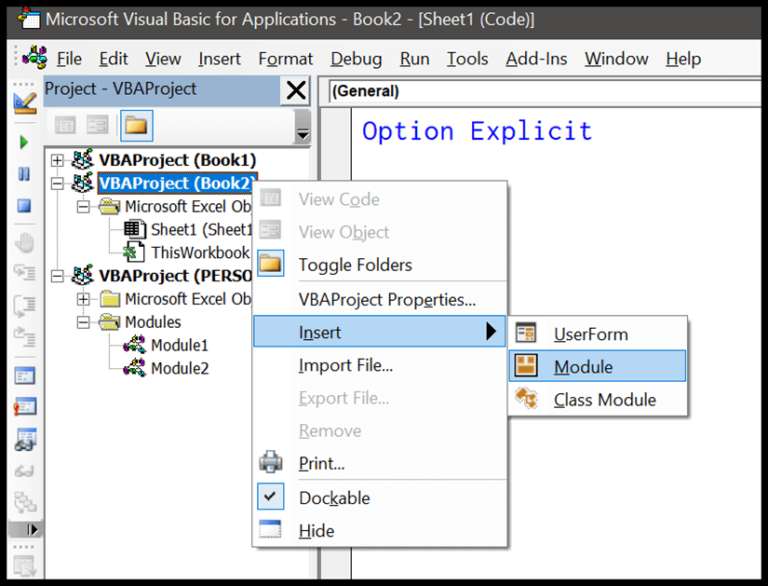
Finally, the generated code lets me run the created macro anytime, executing the stored instructions precisely as recorded. If I want to see the generated code, I just pop open the VBA editor and navigate to the module where my code resides, easily accessed by the provided links and images.
Cleaning up recorded macros
What you have just done?
I’ve taken a closer look at the macro I recorded, which was supposed to change the font color to red, set the font size to 12, choose Verdana as the font style, and make the text bold. The generated code was verbose, filled with unnecessary properties that weren’t contributing to the intended formatting. That’s common with recorded macros—they tend to include every property related to the actions, even if I didn’t explicitly adjust them.
After identifying the essential lines of code that actually perform these four formatting actions, I was able to trim the excess. For instance, the “TintAndShade” property was superfluous for setting the font color, so I removed it. I also eliminated other redundant properties, keeping only those that set the font size, font name, and bold text.
The result is a much cleaner script that’s easier on the eyes and faster to run:
Sub HighlightCell()
    With Selection.Font
        .Color = -16776961
        .Name = "Verdana"
        .Size = 12
        .Bold = True
    End With
End Sub
I made sure the streamlined code doesn’t repeat the object “Selection.Font” multiple times. I defined it once, then listed all the related properties together, simplifying the structure and making it more efficient.
The final step to clean things up was to debug the code. I went through it step by step, running it side by side with the Excel window. This helped me verify that each line of code worked as expected and only influenced the intended properties.
Read this
As I walk through refining macros, I keep a couple of things in mind. By opening the VBA editor next to the Excel window, I can observe the effects of each line of code in real-time. I use the F8 key to run the code step by step and confirm which commands are necessary and which aren’t. It’s a straightforward way to understand which parts are crucial for the actions I want to perform and which parts are clutter.
Removing comments and extraneous lines does wonders for readability and efficiency. By only keeping lines that directly relate to the formatting I want to apply, I eliminate the noise and ensure the macro performs its task quickly and without errors. Each time I do this, I end up with a clean, concise macro that makes my work in Excel more streamlined and professional.
Naming a Macro
When I hit the “Record Macro” in Excel, I breeze through that pop-up Macro dialog box while keeping a few golden rules in my head for the macro’s name:
- Character Limit: Keep it under 80 characters.
- Avoid the Odd Ones: No spaces, dots, or funky symbols, please.
- Lead with Letters: That first character? Definitely a letter.
I also make sure to steer clear of names that VBA might throw a tantrum about – those reserved words are off-limits.
Now, for the fun bit. I get creative. Instead of yawning at “Macro1,” I craft a name that tells me exactly what it does, like “SumExpenses_May”. When spaces are a no-go, I break out my trusty underscore. It’s like a secret handshake for readability.
Remember, naming macros isn’t just a mundane step – it’s like assigning a secret agent their codename. Cool, right?
Storing the recorded macro
When I record a macro, I decide where to save it with three options:
-
New Workbook: I choose this if I’m starting fresh and want to save my macro separately.
-
This Workbook: This is my go-to for keeping the macro in my current project.
-
Personal Macro Workbook: A convenient choice to reuse my macros across various projects.
After selecting my preferred location, I proceed to record the macro. No matter my choice, I make sure to hit save after I’m finished, especially if I’ve worked in the Personal Macro Workbook or a new one. It’s crucial for changes to take hold—particularly if I’m creating a module to organize those macros.
Relative Reference
When I work with macros in Excel, I often switch between absolute and relative references depending on the task at hand. By default, Excel sets references to absolute when recording a macro. This means that if I record an action like selecting a specific cell, the macro will repeat that exact action every time, honing in on the same cell regardless of where I start from.
However, when I toggle on “Use Relative References” before recording, I get a more dynamic macro. It’s a bit like telling Excel to remember the path I took, not the destination. For example, when I select “Use Relative References” and move from A1 to E5, Excel doesn’t just memorize “E5” but notes that I moved four cells down and to the right of the starting point.
Here’s a quick comparison:
Without “Use Relative References”:
| Action | Recorded Code |
|---|---|
| Select cell E5 | Range("E5").Select |
With “Use Relative References”:
| Action | Recorded Code |
|---|---|
| Select cell E5 | ActiveCell.Offset(4, 4).Range("A1").Select |
In the first scenario, no matter where I begin in the worksheet, running the macro will jump directly to cell E5. In the second scenario, starting from cell D4 and running the macro will take me to cell H8. It’s always a shift of four rows down and four columns to the right from my active cell.
This relative approach is handy because it allows me to execute the same pattern of actions in different areas of the worksheet without adjusting the macro code every time. It’s a real timesaver when I’m dealing with repetitive tasks spread across multiple rows or columns.
What’s great about Excel is that I can flip between absolute and relative modes any time, even while I’m in the middle of recording a macro. So if I started with relative references and suddenly need to lock onto a specific cell, I can switch over to absolute references on the fly. This flexibility helps me tailor my macros precisely to my needs.
Pausing a macro
In Excel, I’ve noticed there’s no option to pause during macro recording like in Word. What I usually do is break up the recording process into smaller chunks. This reduces errors and keeps things manageable. Here’s a quick guide:
- Record in Parts: Split tasks into separate macros.
- Shortcuts: Use
Ctrl + Breakto interrupt if running code needs to stop.
Recording complex tasks in stages is definitely the way to go for me!
Limitations of the Macro Recorder
When I’m using the Excel Macro Recorder, I’ve noticed it’s great for simple tasks, but there are things it just can’t handle as well as raw VBA code. For instance:
- Custom Functions: I can’t whip up custom functions with it, which puts a dent in my custom calculation plans.
- In-built VBA Functions: Similarly, those handy VBA functions are off-limits while recording.
- Conditional Logic: Say I want to check some conditions using an IF Then Else statement? Nope, can’t record that.
- Loops: Need to repeat actions with loops? Macro Recorder won’t help with that.
- Object Interactivity: Want to make text bold without selecting the cell? The recorder requires me to select cells before performing any actions.
So while the Macro Recorder is a nifty tool, it’s got its boundaries. I’ve got to select objects, can’t do fancy functions or loops, and forget about sneaking in any logical conditions directly.
Is it worth using the macro recorder?
- Boosting Productivity: By automating repetitive tasks in Excel, the macro recorder significantly enhances productivity. No need to repeat the same steps; just run the macro.
- Learning Tool: As I’ve experienced, it’s handy for understanding the steps to code more complex actions, like inserting a pivot table.
I’ve found it particularly useful when needing to create VBA code but missing some object knowledge. Recording the process and analyzing the code later helped me grasp the necessary components.
Here’s a practical example of where it saved me a whole lot of time:
| Task | Without Macro Recorder | With Macro Recorder |
|---|---|---|
| Insert Pivot Table | Several Minutes | Instant Execution |
| Apply Custom Format | Tedious Step-by-Step | One Click |
Though recorded macros might need refinement, they serve as a robust foundation, slashing the time needed for mundane tasks. And for creating complex tools, like an inventory management system, starting with a recorded macro provided me with a solid base to develop a functional template.
Wrapping up
Before I hit the Record button, I always double-check a few things. Here’s my quick checklist:
- I’ve got my workbook open and others closed—gotta keep it tidy.
- I’ve selected the right element—don’t want to record the wrong action!
- Absolute or relative references? Decided!
- And, I’ve planned my steps—makes the recording smooth.
Ready to run? Let’s do it! If you need to brush up on VBA basics, check out What is VBA.
Related Tutorials
-
VBA Basics and Debugging
- Wondering about VBA interview questions? I’ve got a rundown here.
- Ever get stuck adding comments or line breaks in VBA? There’s a tutorial for each.
- When printing strings, it’s handy to know how to insert a new line.
-
Running and Organizing Macros
- Need help running a macro or using the personal macro workbook? I’ve got you covered.
- Learn when to use Exit Sub to stop a macro in its tracks.
-
Enhancing VBA Code
- Level up your debugging with Immediate Window tricks.
- Get familiar with VBA modules, msgbox, and key objects for smoother coding.
- With statements can tidy your code and make it faster to write.
-
Macro Recorder & Developer Tools
- Curious where the Macro Recorder button is, or how to see the code it generates? It’s all in the Developer tab and Visual Basic Editor.
- Macro Recorder doesn’t always spit out clean code, so you’ll want to learn how to give it a good scrub.
- Forgot how to add the Developer tab? It’s easier than you think!
Remember, while macros can save time, the recorder isn’t foolproof – always review and refine the code it churns out.
